Deploying Printers Using Group Policy – Networking Printers & Windows 2008 Server Part 2
In the first part of this article series covered adding the Print Services role to a Windows 2008 Server, and then how to use the Print Management console to add shared printers with the correct drivers for your network clients. For a small network this may well be all you need to know, but with more users and printers there are more tools available to simplify management. In this article we will look at automating printer deployment with Group Policy and how to use GPOs to assign access to printers.
Windows GPOs
Anyone responsible for managing a Windows domain based network should be familiar with the basics of Group Policy Management, and the granular control it allows over virtually every setting available within the Windows client systems. Although quite impressive results can be achieved with old style login scripts (especially if you know vbscript), Group Policy Objects can do much more without requiring you to become a scripting expert. This particular printer challenge is a good example of how apparently complicated solutions can be achieved with a few simple GPO settings and some planning:
Pre-Requisites
To use Group Policy for printer deployment you will need to have a Windows Active Directory domain, and this article assumes that your Domain Controller is a Windows 2008 R2 Server. You will also need the Print Services role installed on a server (can be on your DC), and you will be using the Print Management and Group Policy Management consoles to configure the various settings. Its assumed that you have already followed Part One and have one or more printers shared on your server with the necessary drivers, ready to deploy to your client computers.
Planning Your Printer Deployment
The first thing you need to do is to establish your printer deployment requirements – which users or computers need access to which printers. Ideally to avoid confusion for users you don’t want to give them access to printers they will never use, especially if your network is spread over a large building or multiple sites. If you havent done so already then now would be a good time to check that the descriptions and location details of each shared printer are correctly filled out, see Part One for details of how to do this.
Group Policy Objects need to be linked to Organisational Units in your Active Directory, so in order to effectively manage your printer deployments you will need your users and computers divided into suitable OUs. This is particularly important if you want to deploy your printers according to location, so for example if you have an OU containing all the computers in the Accounts department you can then create an “Accounts printers” GPO linked to it. For larger multi-site networks its also worth noting that you can assign printer deployments GPOs to AD Sites, so that laptop users moving between sites will automatically get local printers installed for them.
Printer deployment can be applied as part of either the Computer or the User Configuration section of the GPO, or even both, so there is plenty of flexibility as to how you can set it up. There is also no requirement to create separate GPOs for the printer deployment, so if you already have them set up to configure other features on your client systems you may find it easier just to add the printer settings to your existing GPOs. However for the purposes of this guide we will create a new GPO just for our printer deployment.
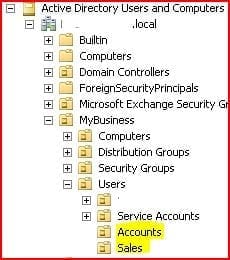
In this article we will be using a small network as our example; it has a Windows 2008 R2 Domain Controller with 20 client PCs running a mixture of Windows XP and Vista, split between two offices which each have their own printers in. One office is “Sales”, the other is “Accounts”, and because their IT requirements are quite different there are two OUs setup in the AD, not surprisingly named “Sales” and “Accounts”.
There is also one large copier/printer device which we will want to give all users access to, so our Printer Deployment GPO planning is therefore quite simple; we can have one GPO linked to the “Users” OU for the large copier/printer, and then we will have a GPO each for the “Accounts” and “Sales” OUs that deploy their respective office printers.
Creating a GPO
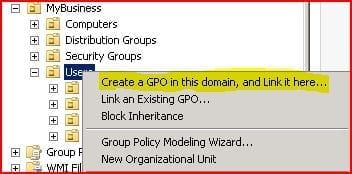
Once you have established your printer deployment requirements the next step will be to create the GPO that will apply the settings to the clients for us. To do this you will need to open the Group Policy Management Console (GPMC), which you should find listed under Programs – Administrative Tools on your Domain Controller server. Expand the tree down through your domain until you can see the OU where you have decided you need to create your GPO, then right-click on it and select “Create a GPO in this domain, and Link it here….”:
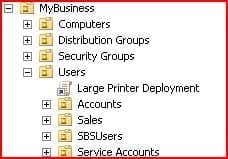
Using the example from above we will create a GPO to deploy our large printer for all users, so having right-clicked on the “Users” OU and chosen to “Create a GPO…” we will name it “Large Printer Deployment” when prompted so our GPMC now looks like this:
Supporting Windows XP Clients
If you are fortunate enough to only have Windows Vista and later versions on your network then you can happily skip this step and proceed to the next section, as they already include support for GPO printer deployment. However if you have any Windows XP client systems, or Windows 2003 Servers (e.g. a Terminal Server) that the GPO will apply to then you need to configure your GPO to install the “pushprinterconnections.exe” utility onto them. Rather pointlessly, Windows 2008 Server only includes the 64bit version of this utility, and its highly likely that your Windows XP clients are of the 32bit variety, in which case you need to download the pmcmgmt.exe utility from here and install it on one of your XP clients. Once installed browse to the C:\Windows\PMCSnap folder on that PC and copy the pushprinterconnections.exe file over to your server.
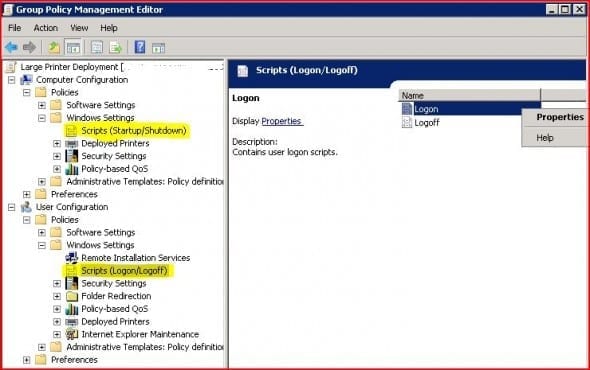
Now you have the vital 32bit version of the utility, right-click on your new GPO and select “Edit”, and a new window will open containing the options for your GPO. Depending on whether this is a Computer or User based policy (in our example we are applying it to Users) expand down to “Windows Settings” and then select “Scripts” and then in the righthand pane right-click on “Logon” (or “Startup” if it is a Computer policy) and select “Properties”:
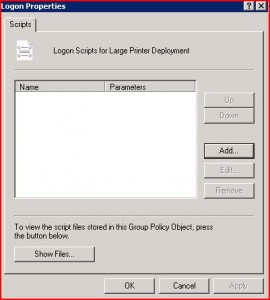
This will open the “Logon Properties” window (or “Startup Properties” for Computer configuration):
First of all click the “Show Files” button, which will open a Windows Explorer window showing the “Logon” folder – this is in fact one of the default system shared folders on a Windows Domain Controller that clients can access during the logon process. Unless you have previously configured logon scripts or other utilities to deploy via GPO it will be empty though – you now need to copy the “pushprinterconnections.exe” file you downloaded earlier into this folder.
You can now close that folder window and return to the “Logon Properties” one, and this time click the “Add” button, which will open another window asking you for the script name and parameters. Just click the “Browse” button in that window and it should open the “Logon” folder again, this time with the “pushprinterconnections.exe” file in there. Double-click on the file to select it, leave the “Parameters” field empty and then click “Ok” to close the window. You should now see “pushprinterconnections.exe” listed in the “Scripts” section of the “Logon Properties” window and can click “Ok” to close that.
Note that for any additional printer deployment GPOs you create you should repeat this step to add the pushprinterconnections utility, it doesnt cause any problems if it ends up running twice.
Adding a printer to your deployment GPO
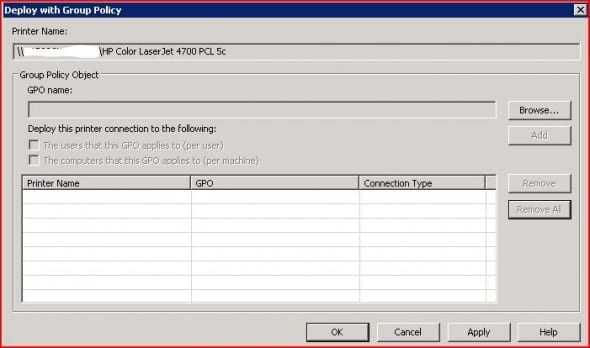
If you have had to edit your GPO you can now close that window and the GPMC, and instead open your Print Management console which you should be familiar with from part one of this guide. Expand the “Print Servers” section and select “Printers” to view the list of printers that you have shared in the righthand pane, then right-click the printer you wish to deploy and select “Deploy with GPO”. You should then see this window:
Now click the “Browse” button to select the GPO you have just created, in the window that opens you may find it easier to just click the “All” tab to view all the GPOs on your domain and scroll down to the appropriate one, then select it and click “Ok”. You will then see you have two options available, to deploy the printer connection per user or per machine – check whichever your policy applies to and finally click “Ok” to close the window. It is possible to have a printer deployed via multiple GPOs if your setup requires it, as you can see the “Deploy with Group Policy” window lists them and you can also remove them from here if necessary. You may also select the “Deployed Printers” option in the Print Management console to see the complete list of printers that you have deployed via GPO.
Final Steps
You should now have successfully deployed your first printer via GPO, and if you logon to an applicable computer or as a suitable user you should see that the shared printer is available for use. If it isn’t then check the Event Logs as any error with the GPO deployment should cause an event to be logged that will indicate the source of the problem. Should you not see any printer or any warning in the Event Log then you may want to use Group Policy Modelling or the “gpresult” tool to check that the GPO is being correctly applied.
Group Policy Preferences and Setting the Default Printer
On a final note, you may encounter some guides that recommend the use of Group Policy Preferences for printer deployment instead, and in some scenarios that method does have advantages. However it is more complicated to manage and does not integrate with the Print Management console, hence why I prefer the standard Group Policy. There is one particular situation where they can be particularly useful though, which is when you need to set users’ default printer, but that is something to be covered in a separate article.


