


Increase Boot Volume Size of a Windows Server 2008 Virtual Machine
How often have you found yourself running out of space on your boot volume on your Windows server? Before the release of Windows Server 2008 the process of expanding the boot volume was tedious, and in most cases involved downtime and the usage of third party partition tools to get the job done.
Using Windows Server 2008 you can use the native Disk Manager expand (and in some cases shrink) the boot partition without any downtime at all!
Let me demonstrate this using VMware vSphere with the Windows Server 2008 system as a virtual machine (VM). If your Windows server wasn’t virtualized, this same process would apply but you would have to either have additional space available on the physical disk or you would have had to dynamically “hot” added a new physical disk.
Expanding the Boot Volume
To demonstrate how this works, I installed Windows Server 2008 as a virtual machine inside VMware ESXi 4.0. During the creation of the VM the boot partition size was set at 20 GB, which in Windows Server 2008 might just be a bit to small.
To expand it, we need to expand the virtual disk first. This is a simple process, all it needs is a couple of mouse clicks and you’re set.
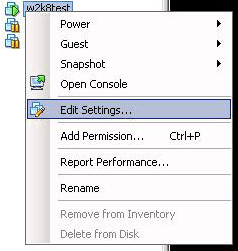
In the vSphere Client, right click the virtual machine and select Edit Settings
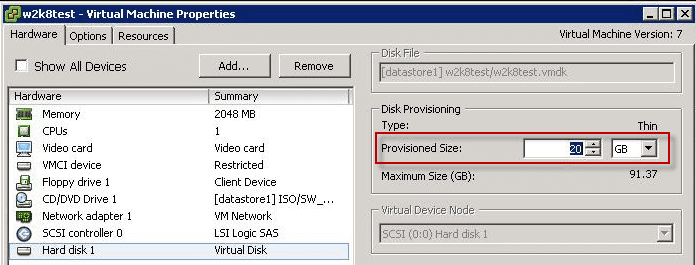
Next, you need to find the virtual disk and edit it’s size from 20 GB to 30 GB, or any other size you might want, click OK and let it weave it’s magic.
The disk should now be expanded, but Windows Server 2008 still doesn’t recognize the new available space. This is where the Disk Manager enters the picture.
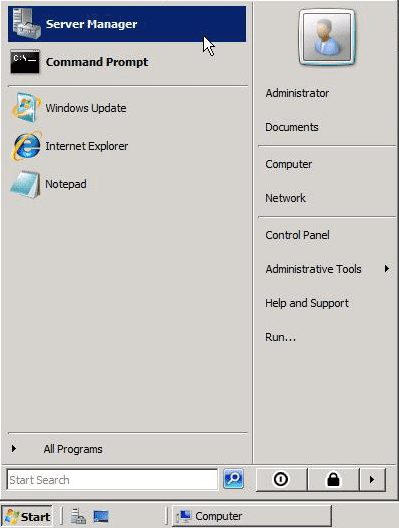
Navigate the Start Menu and find Server Manager. Find the Storage node, expand it and select Disk Management
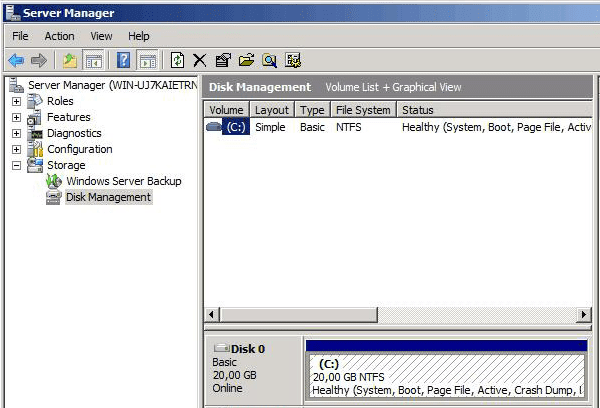
Right click Disk Management and use either Refresh or Rescan Disks, both should work just fine. When the refresh is finished, you should see the newly added extra 10 GB as unallocated space on the disk you expanded. In our case it’s Disk 0, as thats the only virtual disk that is attached to this particular server.
Right click the c:\ volume, and select Extend Volume and the “Extend Volume Wizard” should appear. This is pretty straight forward, but click next and you will be presented with a the tool that allows the volume expansion.
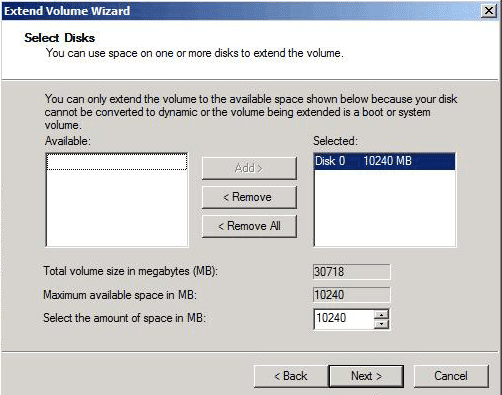
By default, the wizard will select all available space in the Selected column, but you can tweak those settings if you like. When you have done a selection you’re comfortable with, click Next and a summary screen will appear outlining the changes you have made. If you are satisfied with your choices, click Finish, if not select Back and redo your settings.
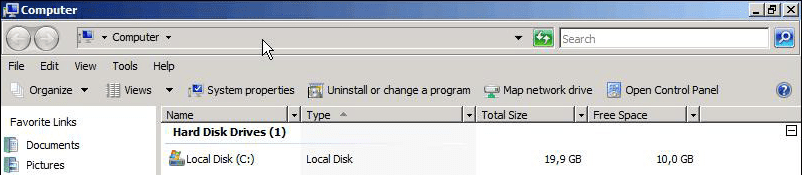
Lean back and see that your boot drive has been extended to 30GB instead of 20GB, all without any downtime or interruption of service at all.


Note that if this was a physical machine, and not a virtual one, it would be a bit harder to accomplish. It would require that you have available, unpartitioned space, on the physical boot drive. Normally that’s not the case and you would still need third party tools to be able to repartition your boot drive to free up some space that you could expand your boot volume with.
Summary
The Windows Server 2008 Disk Manager allows you to easily expand a boot volume, given that you have available unpartitioned space available to it. This great feature add-on in Windows Server 2008 might just prove invaluable to you down the line, especially in virtualized environments. The “Extend” feature only works when there is unallocated space available directly adjacent to the boot partition. That is too say, you cannot extend the system partition by shrinking others partition, you have to delete the partitions.