Networking Printers & Windows 2008 Server – Part 1
- Blog
- Networking
- Post
This is the first of two articles explaining how to share and manage network printers with MS Windows 2008 Server. Part 1 explains how to add the Print Services role to your server, and then how to use the Print Management console to install and make printers available to users on your network. The second article will examine more advanced features such as automating printer deployment with Group Policy and logon scripts.
Requirements Before You Start
This guide assumes that you have a Windows based network, with a Windows 2008 (R2) Domain Controller – either a standard server or a Small Business Server 2008/2011 server. Ideally all your printers should have a built-in networking capability, or shared on the network from the PC they are attached to, and you need to make sure you have downloaded all the drivers for the different versions of Windows client on your network. When you have both 64 and 32 bit versions of a print driver it is essential to make sure that the version numbers of the driver package are identical, otherwise it will not work.
Setup a Print Server
There are two main benefits to centralizing all your shared printers onto a print server, firstly you can install all the different Windows client drivers on the server so they are automatically deployed, and secondly it greatly simplifies the management of the printers.
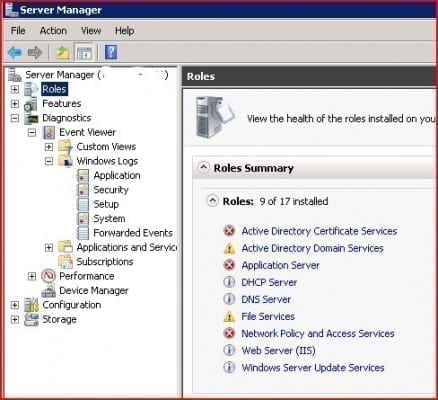
First of all you need to ensure that your Windows 2008 Server has the Print Services role installed, so logon to it and open the “Server Management” console, then click “Roles” in the left-hand pane:
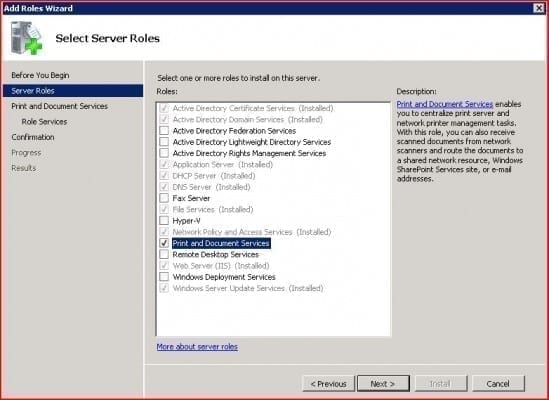
The “Roles Summary” will list all the roles currently installed on your server, and if like above you don’t see Print Services then you will need to add it by clicking the “Add Roles” link. This will start the “Add Roles Wizard”, click Next past the introductory page and on the next one click to check the “Print & Document Services” role:
Click “Next” and the next page explains some of the basic principles of the Print Services role, once you’ve read it click “Next” and on the following page you are asked to select specifically which services you require. Here we only need “Print Server”, which should already be ticked, unless you know you have a need for any of the other role services then leave them unticked. Click “Next” to take you to the confirmation page and then click “Install” to add the Print and Document Server role. The installation process should only take a minute or two and then you can click “Finish” to close the wizard. A restart of the server should not be required.
The Print Management Console
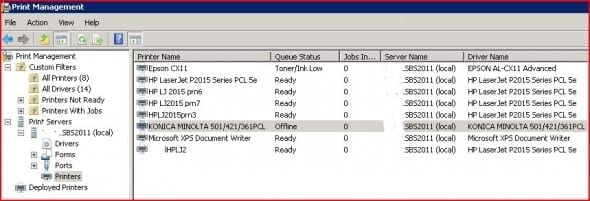
Now you have the Print Services role installed on your server you can use the Print Management console to perform all your printer administration tasks, so open it by going to Start – Administrative Tools – Print Management. Expand the Print Servers tree, then your server and click “Printers” to view the printers already installed:
Adding a Printer
If you need to install another printer then right-click on “Printers” in the left hand pane and select “Add Printer” to start the “Network Printer Installation Wizard”. The procedure is very similar to the standard Windows Add Printer wizard – either add your printer by browsing the network or enter its IP address directly, and if you are fortunate then it will detect the printer type automatically and install the driver. By default the wizard will offer to share the printer on the network. It’s unlikely you would want to uncheck this option but in the same window you can also provide additional information such as the printer location. Filling in these fields will make it easier for your users to identify the printer they wish to use, especially if you have several identical model printers on your network, so it is worth doing now. Repeat the process until you have added all the printers you wish to make available to your users and they should be listed in the central pane.
Installing Additional Drivers
The secret of successful network printer sharing is getting the correct drivers on the server, then the process of deploying them to the client PCs will be completely automatic. Ideally you will have a brand new network with all 64bit Windows 7 desktops, in which case the standard Windows 2008 drivers are all you need, however this rarely occurs and it is far more likely that you will need to support a mixture of 32bit XP and Vista clients too. The most important thing to remember at this point is that all the version numbers for the printer’s drivers must be the same, otherwise Windows will not accept them as being valid. Some manufacturers make this easier than others, for example HP are usually very good at clearly displaying the driver versions on their download page:
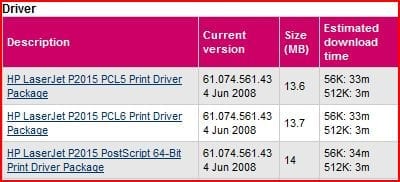
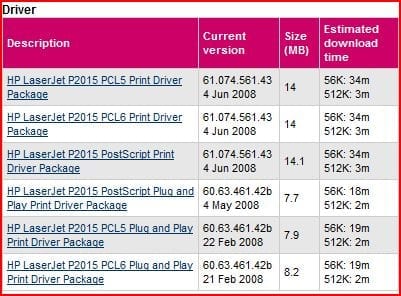
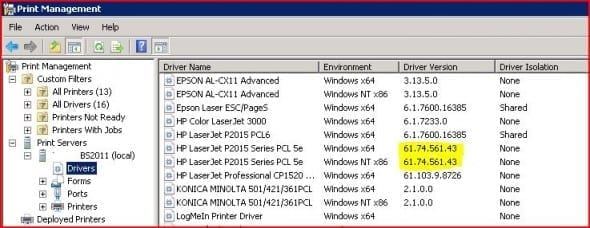
In the example above you will be fine if you download the PostScript driver package dated 4th June 2008 for both 64bit and 32bit versions, as the version numbers are identical. You need to be especially careful where your server already has a 64bit driver package installed, the best option is to download the latest version of both the 64bit and 32bit drivers, then you can ensure you have up to date and matching driver versions. Selecting the “Drivers” option in the Print Management console allows you to easily see what versions you have installed on your server, here you can see that we have the latest version of the PCL5 driver installed for our LaserJet 2015 both 32bit (x86) and 64bit (x64) Windows clients:
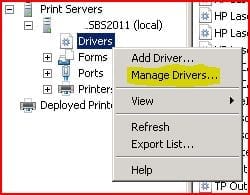
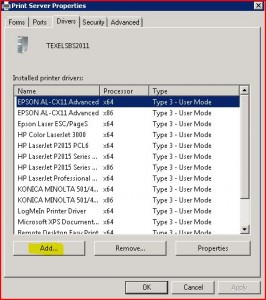
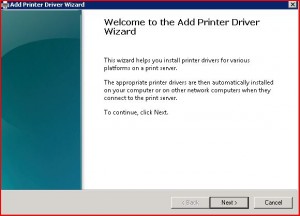
Should you need to add or remove printer drivers then the easiest way to do it is to right-click on “Drivers” in the left pane of the Print Management console and select “Manage Drivers” from the dropdown menu. This will open a new window listing all the drivers installed on your server, removing any one of them is simply a case of clicking to select it and then clicking the “Remove” button. Alternatively, to install a new driver click on the “Add” button to start the wizard:
Click “Next” on the introductory page and the next page will ask you to select what type of driver package you are installing – its unlikely you will have an Itanium system so the choice is likely to be between “x64” – 64bit drivers, or “x86” – 32bit drivers. Most driver packages will be specifically 32 or 64 bit, not both in one, so you should only have one box checked before you click “Next” to continue the wizard.
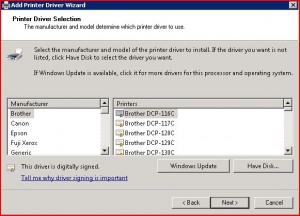
This window may well look familiar to you, its been a standard part of Windows printer installation since at least Windows XP, and chances are that your model of printer will not be listed, so you will have to click “Have Disk”. At this point you will be prompted to browse to the location where you downloaded your driver files to. If the correct “.inf” file is there, Windows will recognise it and list the models of printer the driver supports – you just have to click the correct model to select it and click “Next” to install the driver, then “Finish” to complete the wizard.
Extracting Printer Driver Files
At this point you may encounter a problem because Windows does not recognise the driver file you have downloaded, or you cannot locate the necessary “.inf” file. With most “business” model printers this should not be an issue. For instance, the HP LaserJet drivers in the example above come as a self-extracting “.exe” file. Running it after download will prompt you to specify a folder to extract the files to, and this is the location you should browse to after clicking “Have Disk”. However, some manufacturers supply their drivers as “user friendly” automatic installation programs, which start an application installation style routine when run and will try to do the full printer setup for you. This is not ideal as it will usually just install the printer as a local device, and will not work at all if it is a 32bit driver which you are trying to add to a 64bit server.
Depending on the type of installation package supplied, there are several options available to you to get around this problem. The best solution being to revisit the manufacturer’s website and try to locate standalone driver files. Some “consumer” type printers come with large installation packages which install additional applications as well as the driver, to be honest you are probably better off not trying to share one of these from your server as it isn’t suitable for the task. With other packages, you may find that instead of running the “Setup” program you can browse to its folder and locate the necessary driver files hidden within it. These will include one or more “.inf” files that tell Windows the models of printer it supports.
You only have to make the driver files available to Windows for the “Add driver ” process, it will then copy the files it needs to another location and retain them for future use. When you are subsequently installing the shared printer on any user desktops, the Windows OS should then be able to download the correct driver files from the server automatically.
Conclusion
Once you have added the printers and relevant drivers to your print server they will then be available to install on your client desktops using their “Add Printer” wizard. Should you only have a small number of users and/or printers, then this process should be easy enough to manage manually, but for larger deployments there are various automation methods available. The second part of this article will cover advanced techniques such as using Group Policy to deploy printers to users, and controlling access using permissions.


